Here it is.
Sorry if it is a bit long and waffley, I would appreciate any comments to help make anything clearer!!
IMAGE ORGANISER BOX
This is all the equipment you will need to make the Box:

2 pieces of A4 card (SU Barely Banana)
Designer Series Paper (SU Junior Varsity)
Contrasting Cardstock (Co'ordinates)
Grosgrain Ribbon (SU Mini)
Adhesive
Sticky Tabs (or SU Dimensionals)
Scorer
Scissors
Pencil
Ruler
And Punches (Oval Scallop and Oval Punches from SU Mini)
Base: 20.7cm by 25cm
Lid: 19cm by 13.3cm

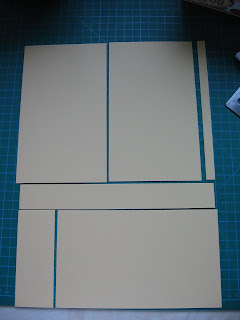
For the base score along the long side at 10cm and 15cm
Then along the shorter side score at 5cm then 15.7cm
For the lid score along all four sides at 4cm
The cut as shown in the photo
Finally fold along all score lines.
Base: now with the right side (you decide) of card facing up stick adhesive on the flaps as shown
Then Flip base over, left to right, and stick adhesive as show here


Lid: With right side up. place tape as shown, on all four corner flaps on all four edges.

Before assembling Base and Lid make up and add all the mats.
Base:
Contrasting Cardstock:
2 pieces measuring 4cm x 9cm
1 piece measuring 9cm x 9cm
Designer Series Paper:
2 pieces measuring 3.5cm x 8.5cm
1 piece measuring 8.5cm x 9cm

Lid:
Contrasting Cardstock:
2 pieces measuring 10cm x 3cm
2 pieces measuring 4.5cm x 3cm
1 piece measuring 4.5cm x 10cm
Designer Series Paper:
2 pieces measuring 9.5cm x 2.5cm
2 pieces measuring 4cm x 2.5cm
1 piece measuring 4cm x 9.5cm
2 pieces measuring 4cm x 2.5cm
1 piece measuring 4cm x 9.5cm

Adhere all of these pieces together and then adhere to Base and Lid.
Before adding the main Base Mat it is a good idea to attach the Ribbon then it is secured when the piece is adhered to box.

Then Assemble Box Base and Lid.


For the Base be sure that the small flap goes on the inside and the unmatted flap goes next then finally the matted flap on the outside.


And that's it, one finished Box!

I added extra detail to this box using the SU Oval and Scallop Oval punched and the Oval All Stamp Set. All three are now available from the Mini Catalogue

To make the Files for inside, if you wish to turn your box into an Image Organiser, You will need a further two pieces of cardstock and cut 6 pieces to measure 10cm by 17cm, you can get three out of one piece of A4 cardstock.
Fold each one in half to measure 10cm by 8.5cm
and then add a tab punched out of the Tab Punch from SU


Hopefully all this makes sense. Please let me know If there are things which aren't clear. I would appreciate all comments good or bad.
Thanks for looking
Hugs Sarah B X
Hi Sarah, this is FAB! I can't wait to have a go myself, the instructions seem quite straight forward and the photos are plentiful which is brilliant. Many thanks!
ReplyDeleteKeryn :D
OH I love it
ReplyDeleteits a fabulous Tut sarah
hugs Toni
Thank you for the great tutorial. I like the boxes and I hope I will find the time to make one myself. The directions are very clear and the pictures are clear too.
ReplyDeleteNanda
Thank you for the great tutorial. I like the boxes and I hope I will find the time to make one myself. The directions and the pictures are very clear and easy to follow.
ReplyDeleteGreetings, Nanda
Wow Sarah these are amazing, you are so clever!! great tutorial!
ReplyDeleteJustine
this is great hun..so cant wait to have ago at this...might try it out tomo..and will let you know..lovely clear photo's and the instructions are clear as well..thanks clare xx
ReplyDeleteOh wow I will have to try this when I get plenty of time as it looks lovely.
ReplyDeleteNot suppose to be blog hopping but couldn't resist seeing what you've been up to! Fabulous tutorial for a fabulous project, you go girlfriend! lol xxx
ReplyDeleteWow Sarah, well done you, great tutorial!!
ReplyDeleteMandy
Fab tutorial. I want to see more! Julesx
ReplyDeleteI like this seems streight fwd enough I will hopefully make time to do this.
ReplyDelete(is there any chance you could do this as a PDF then I can print it off)
It would make things easier to follow when I'm making it. Althought I have no idea how that is done.
(I was lead here by Stephs blog!)you are very good just as she said.
Love Dawn xx
I don't know why but I yesterday, I suddenly remembered about this tutorial as I needed to make a small box for some notelets I made as a gift. The sizings you used weren't quite right for the project so I adapted it and it turned out great. I have posted pics of mine on my blog (have used the Elzy dogs!). Thanks for the great tutorial.
ReplyDeletePaul
Sarah,
ReplyDeleteI can't wait to have a go at this tutorial. Before I start though, what are the dimensions of the completed box please?
Thanks for sharing.
Alex x