Not sure about the wise bit but I'm definitely becoming an old bird! LOL!
This is not my idea the original idea came from Angie at Chic'n'Scratch. But I have modified it slightly to fit in with the punches we have available from Stampin' Up.
These are the punches you will need, all available from Stampin' Up and if not I'm sure there is one close to the size I use.My punches are from EK Success which are the same company that make Stampin' Up's Punches.
These are the punches you will need, all available from Stampin' Up and if not I'm sure there is one close to the size I use.My punches are from EK Success which are the same company that make Stampin' Up's Punches.

The 2" Circle I have used is a Woodware Punch, but I'm sure a nestie would work just as well.

Right, Lets get started. This is the page from My Punch Book, which is filling up gradually, (I'll show it another day).

These are the bits and pieces you need to punch out:
1 x 2" Cicle from Chocolate Chip
1 x Tab Punch from Chocolate Chip
2 x Scallop Ovals from Creamy Caramel
2 x 1" circles from Creamy Caramel
2 x 3/4" from Whisper White
2 x 1/4" from Black
2 flowers from Boho Blossom

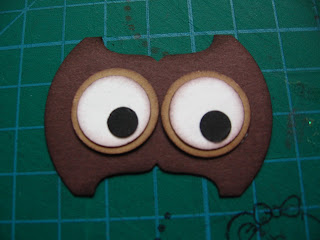
Ink all the edges of the various pieces. Layer up the 1", 3/4" and 1/4" inch circles as follows in the next few photos.


Then position as follows on the Tab Punch out

Cut the smaller flower as follows

I think these photos show it better than I could explain.

Then stick to the back of the head (Tab Punchout)

Using a white gel pen draw a little V to look like little feathers.

This is the Head complete. Attach three sticky tabs to the back.

Stick the wings (Scallop Ovals) to the body (2" Circle)

Then stick on the head.

Using the larger Boho Blossom flower cut as follows:


Then stick to the back of the body, on the bottom edge.

Add a little detail to the wings and chest to look like feathers and The Owl is now complete.

Isn't she / he adorable. Perfect for any Teacher.

I used mine on the front of a card adn on the front of a note book / mini album


Hopefully over the next few days I'll share some other ideas I had for my satchel and its contents.
Thanks for all your fab comments.
I have not forgotten about my Pink Cat Studio Images Give away if you are interested scroll down and leave a comment,
Hugs Sarah B X
Wow, this really is fantastic. You are so clever. Thank you for showing us.
ReplyDeleteClare x
Wow Sarah, this is amazing - you're so clever.
ReplyDeleteHugs
Penni
X
Oh Sarah - gorgeous. Such a clever use of the punches. You are such a huge inspiration to every who looks at you blog. Such a pity you don't live in the same village as me!!! LOL Love Terri XX
ReplyDeleteoooooooo this is so cute Sarah and another fab tutorial !!! I am going to have to have a go at this wee guy!!
ReplyDeletetake care
Mandy
x
Wow - another winner! Can't wait to have a go.
ReplyDeleteThank you so much for the award, and for your comment. x.
Things not too bad at the moment. Hope to see you before too long.
Love x
Ohhh this is fab! He's just so cute! Going to try this one now! :o) xxxx
ReplyDeletethis is great hun..he's so cute and the card,book and bag as well..TFS your such a clever girl..xx
ReplyDeletethanks for you congrats on the promarkers..cant believe its me out of 167 comments..so cant wait for them to arrive so i can try them out for the first time.
hope things are well..not long now until half term...can wait xx
So beautiful, I can already see myself making a card with this cute owl :))
ReplyDeleteHana
So beautiful :)
ReplyDeleteI can already see myself making a card with this cute owl!
Hana
WOW Sarah you clever thingy - that owl is the cutest and your tutorials are always so inspiring.
ReplyDeleteThanks so much for sharing.
Take care,
Emma x
this is fabulous Sarah I love it
ReplyDelete