Ok, here it is, talk about, paddling upstream, I've had ironing, visitors, children, I didn't think doing a photo tutorial would be so time consuming, but here it is, at last!!!!
Enough of me ranting! Apologise cos its quite a long tut!
1. Stamp your image in a waterproof ink, such as memento, its the best for Promarkers, pop over to Tracy at Dies to Dies for.
2. Right for this tutorial I haven't chosen papers to go with it, I've just gone with colours I like. Normally I'd have the papers I want to make a card from as my starting point.

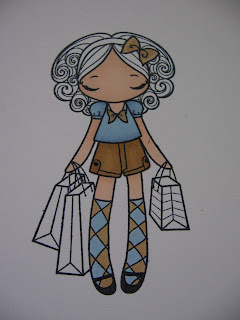
3. This is Miss Anya, who adores shopping, today she is going to get the Promarker Treatment.

4. For skin tones I tend to use Blush as a base and Dusky Pink for the shadowing.

5. First of all Blush, on all the skin parts.

6. Then I apply another layer of blush, where I'm going to want the shadows, leaving area which need to be highlighted.

7. Then I apply another layer again in the areas of shadow, but also areas of dark shades, such as under the chin. I tend to do this cos I don't really like the blender pen.

8. I then apply a line of Dusky Pink, just under the hair, along the line below the sleeves and shorts and under the chin, on the neck.

9. This next step is really difficult to explain but I'll try. To help blend I use a techniques I call feathering. I gently flick the pen from the darker areas upwards or downwards, quite lightly. Its a sort of dragging motion, but not putting full pressure on the pen, this gives a really effective, graduated colouring.

10. I'm using Sandstone and Cinnamon, but you can use other colours, but use a light and dark shade.

11. Next the shorts. To start with, just one even layer of Sandstone.

12. I then apply a line in the areas where there would be shadows, below the top, at the side of the zip, and down the outside and inside edges. At this point I leave it to dry fully.

13. I like the combination of blues and shades of brown, but again use your own choice, but a light and dark shade, here I'm using Pastel Blue and Cornflower.

14. So one even layer of Pastel Blue.

15. And the socks.

16. While the pastel blue is still wet apply a line of Cornflower at the bottom of the Shirt. Then again while still wet use Pastel Blue and apply a second even layer.
17. To co-ordinate I coloured the socks and bows in sandstone as well.

18. Then ran a line of Patel Blue down the outside and inside of the socks, creating shadows.

19. Then to create highlights I ran a white gel pen down the centre.

20. I continued this up the legs and onto the shorts.

21. Now the skin is completely dry, I applied a line of Dusky Pink, under the hair line, sleeves, chin, and short legs.

22. I then remembered to colour the hair band, two layers of Pastel Blue.

23. Now the Hair, I like strong browns, or sandstone. I'm not really a blonde!!!!

24. After applying one even layer of Cocoa, I then went back and picked out strands. (I also added highlights to the hair band and bow).

25. Finally, I applied a third layer in areas of shadow, behind the bow, and around behind the face. When the ink has dried, it looks quite subtle.

26. The figure is now almost complete.

27. These are the colours I decided to use for the bags.


 27. For each one I applied one layer, then in areas of shadow, I applied another layer to darken the colour. For extra definition, I used the gel pen again. The inside of the bags were coloured using two shades of Ice Grey, 3 & 4.
28. To highlight the hair, I quickly scribbled lines of White gel pen, to give the effect of shine!

29. The final step is to use Ice Grey 1, and outline the entire image, it really makes it pop!
Hope this is ok, If there is anything I have forgotten, or you have any questions lets me know.
Hugs Sarah B X
Wow!!! Sarah, this is amazing, no wonder it took so long, it is so detailed, thank-you so much for your help. Hope you are all doing O.K.
ReplyDeleteHugs S.J. xx
Super tutorial Sarah! You explain yourself very well and I love the clear pics. I know it takes ages to make a tutorial like this so I really appreciate it! Got some Tilda's that need the Promarker treatement and I feel much more confident thanks to your lovely self! Ta!
ReplyDeleteHugs,
Aimes
x
great tutorial .. very helpful too, dont think i'd have had the patience to do all the photos . Its a good job not everyone is like me lol. Can i ask which brand of white gel pen did you use it's very effective well done
ReplyDeleteThis is fab, thanks so much for taking the time to do this, it's really helpful as I'm still learning with my PM's and it's great to pick up so many tips.
ReplyDeleteThanks again
Jan x
Great tute, very clear instructions and photos. And Miss Anya is gorgeous!
ReplyDeleteA fab tutorial Sarah! The tips for using the gel pen are great, here's hoping I can improve my colouring!!
ReplyDeleteSarah your tutorial is fab, so clear and great photos. Deffinitely well worth your effort!! I haven't used my promarkers for so long but after seeing this I may have to dig them out again.
ReplyDeleteYour images always look brilliant, you deffinitely have a great eye for colouring and highlighting in the right places.
Mandy
x
Sarah, what a great tutorial, you have put a lot of work into but its so worth it cause this is just great, fab photo's and you explain things in a simple way!! :)
ReplyDeleteHugs Ida
OMG! I love your coloring and appreciate the tutorial, even though I don't have those markers. I am thinking that I can use my Prismas and Gamsol to get similar effects....and, of course, that gel pen.
ReplyDeleteThanks for taking the time to make this tutorial!
Cindy
Just found your tutorial....I love it...gonna have a go at this A.S.A.P. Thanks for sharing.
ReplyDeleteHugs
Sarah
fantastic tutorial thank you
ReplyDeleteits really helpful, there are a lot of tutorials for copics but I am a Promarker girl and yours is the best tutorial that Ihave come across so far for what I wanted and needed to know.
Best Wishes Kit x
Hi just to say brilliant tutorial, just starting mt collection of pens
ReplyDeletethanks mandy
I have just got my first set of promarkers and didn't know where to start - but your tutotial really helped. Thank you.
ReplyDeletewww.mess2magic@blogspot.com
Hi , thanks so much for this tutorial, I am about to get my first pens, can't wait, I have seen other tutorials, but this is FAB, so clear and great photo's , I feel inspired now.. hope to oneday produce great work like this..
ReplyDeleteI've just bought my first bunch of Promarkers and your tutorial has really got me "up and running" (hopefully in he right direction!). I imagine this brilliant lesson must have taken a considerable time to pull together and I am most grateful and appreciative. Thanks!
ReplyDeleteMarion
thanks for this tutorial, i followed it and my image looks fab. your work is all wonderful. janex
ReplyDeleteHi thank you, I have just purchased a set of 12, a set of skin tones and the set of greys today and wanted to know how to use them properly, this is an EXCELLENT tutorial well done, it is great, thank you again. Joanne x
ReplyDeleteThis is brilliant, thanks so much - I thought I could colour but now I know I need some help, lol!
ReplyDeleteHi thankyou
ReplyDeleteI too have just bought my first sets of promarkers and wanted to know how to use them correctly. This is an EXCELLENT tutorial, extremely well done and so easy to follow. Once again thankyou. Susan x
Love this---can I ask, where did you use the cinnamon, I can't see any reference to it apart from where you introduce it with the sandstone? maybe I missed it ?
ReplyDeleteThis is lovely i have some Promarkers and have been meaning to get going with them and you have given me the inspiration to start what card do you recommend to use
ReplyDelete