I thought I would start another colouring tutorial using Promarkers, there seems to be loads of Copic ones around but very few Promarkers.
I really think my colouring has developed since my previous tutorial and I'm so appreciative of all the fab feedback I have received, so here goes.
Tutorial No. 1a: Skin - With the Light from the front:

1. I use the CARAMEL where The shadow would be in this case under the hair line and down the sides of the face, also the neck and where the clothing meets the arms and legs.

2. I then use TAN to lighten the shadow so I go slightly over the CARAMEL with a line of TAN.
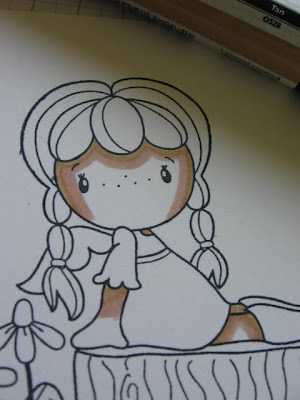
3. Then I put two circles of SOFT PEACH in the place you would find the cheeks.

4. I then use BLUSH in a circular motion to blend the CARAMEL, TAN and SOFT PEACH, working from the outside of the face inwards. leaving the middle of the face til last which gives a lighter effect.

5. I think this gives quite a realistic effect.

I hope you find this useful, I would appreciate any feedback. I'll sort out the hair next and upload the pictures. I'm thinking of providing a PDF File for this as well.
I have found the Charts over at Lili of the Valley really useful with the colours to use, which I'd had this when I started out.
Have a lovely day, I have to plan things for school tomorrow but hopefully won't take too long.
Hugs Sarah B X
ooh this is fabbo Sarah - I wouldn't have thought to use these tones for skin as seem dark but am going to give it a try later today now
ReplyDelete*mwah*
Victoria
x
This is just fantastic Sarah. Thank you so much for taking the time to show us all how to use Promarkers. I have just invested in my first lot, around 24, so I just KNOW your tutorials will be really helpful
ReplyDeleteAgain, many thanks
Jackie in Spain xxxxx
Thank you, thank you, thank you!!! I really need this advice xxx
ReplyDeleteLove the tutorial!! Never used promarkers so may invest!! Love Chanelle xx
ReplyDeleteThanks for the fab tutorial! Although I use copics, I find this very helpful as I always struggle when it comes to working out the shading.
ReplyDeletexx :0)
Great tutorial. I don't have any of the newer shades as my local store has decided not to stock them. May have to looke elsewhere for some of these colours
ReplyDeleteTFS
Paul
Hi Sarah,
ReplyDeleteFab tut it really does look realistic and really brings her to life x
hugs
Suzie qx
thanks for sharing - that is fantastic! Great tutorial - may have to buy some new pens now! x
ReplyDeleteFab tutorial - can't wait to see the hair tutorial. I normally start with the lighter colour first but i'll try this way now. Thanks x
ReplyDeleteThanks for a fantastic tutorial, it is so nice to see it bit by bit because you can see the image grow. Can't wait for the next one now.
ReplyDeleteKim xXx
Good morning Sarah and thank you for that face tutorial, it certainly did help me, and ill be giving it a go later on. thank you for sharing your secrets, your work is amazing hunny keep up the good work, hugs Linda x
ReplyDeleteThis is fab, Sarah. I am always looking for promarker tutorials :)
ReplyDeleteVery useful tutorial. Thank you for sharing. I don't own any Promarkers - yet but I am learning how to use them before I buy! ;) ~Glen~
ReplyDeleteSarah this is fantastic I would never have used these colours but they look soooo real. Please do more and PDF would be fantastic. Thanks Sue :o)
ReplyDeleteSarah, that is brilliant, I have so much trouble with faces. Very much appreciated.
ReplyDeleteSuper tutorial Sarah and nice to see some differnt colours being used. Would love to see something using some of the deeper colours such as the reds or dark blues as I struggle a bit with these!! Juliexx
ReplyDeleteI was so thankful to chance upon this tutorial. I've just bought some p/m's and was not happy with my efforts. This has made it all seem so simple. Many thanks
ReplyDeleteThank you ... Thank you ... Thank You. I so love the tutorial's that you give. After searching the internet for them on how to use promarkers, I really think yours are the best.
ReplyDeleteRight ... I need those colours now LOL ... oh and that stamp.
Hi Sarah,
ReplyDeletethis is brilliant, thank you, i have pro-markers and i have tilda stamps but i wasn't brilliant at giving the images dimension!
:-D
Hi Sarah,
ReplyDeleteThanks so much for this tutorial, I am not too confident at colouring. Your tutorial has helped enormously with layering and blending.
Bless You
Jackie